Run Command Tutorial
Overview
Run Command Tutorial Scenario
This tutorial introduces you to the Komodo Run Command feature. You will learn how to run simple and complex custom commands (such as grep, make, and perl); use these commands to process and analyze files; save commands to run with a single keystroke; and use commands to make Komodo a more powerful editor. In this tutorial you will:
- Run simple commands using the Komodo Run Command feature.
- Use advanced command options to control how and where a command is run.
- Save commands in the Toolbox and assign keyboard shortcuts.
- Using interpolation shortcuts to customize commands for reuse.
- Prompting for input to have your commands prompt you for information before running.
- Parse command output into a list of results by specifying a regular expression.
Opening the Tutorial Project
Select File > Open > Project.
Running Simple Commands
Hello, World!
The Komodo Run Command feature offers another way to run commands that would otherwise be run on the system command line. This section starts with a simple echo command.
- Select Tools > Run Command to open the Run Command dialog box.

- In the Run field, enter
echo Hello World. - Click Run. The results are displayed on the Command Output tab.
Command Output Tab
Output from commands is displayed on the Command Output tab.
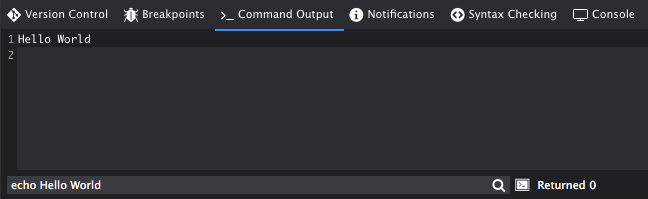
Use the Command Output tab to interact with commands; if the command accepts input, enter it directly into the command on the Command Output tab. The Command Output tab has the following features:
- Output written to
stderr(standard error output) is displayed in red at the top of the Command Output tab. - To terminate a running command, click the
 button in the upper right-hand corner of the bottom pane.
 - Many keyboard shortcuts available in the Komodo editor can also be executed on the Command Output tab. For example, ‘Ctrl’+‘Shift’+‘8’ (‘Cmd’+‘Shift’+‘8’ on Mac OS X) displays white space and ‘Ctrl’+‘Shift’+‘7’ (‘Cmd’+‘Shift’+‘7’ on Mac OS X) displays line endings (if the default key binding scheme is in effect).
The Toggle Raw/Parsed Output View button  is discussed in the Parsing Command Output section of this tutorial.
Inserting Command Output
Insert command output into a document using the Insert output option.
- In the Places sidebar, double-click the file play.txt. The file opens in the Editor Pane; a tab at the top of the pane displays its name.
- Select Tools > Run Command.
- In the Run field, enter the command
dir(on Windows) orls -al(on Linux). - Select the Insert output check box, and then click Run. The contents of Komodo’s current directory are inserted into play.txt.
Filtering Parts of a Document
The Pass selection as input option passes selected text to the specified command. Use this option together with the Insert output option to filter selected regions of a document.
- Open
play.txtfrom the Run Command tutorial project (if it is not already open). - Select all six lines containing the word
frog. - Select Tools > Run Command.
- In the Run field, enter the command
sort(on Windows) orsort -n(on Linux). - Note that the Pass selection as input and Insert output options are selected automatically. If one or more lines are selected in a document, the Run Command expects to filter the selected lines.
- Click Run to sort the list of frogs.
Use the grep command line utility to filter lines of text. Use grep to filter out all but the red frogs from the list.
This tutorial assumes the grep utility is installed on your system and is in your system’s PATH. Grep is a Linux utility that searches for text and characters in files. Windows operating system users may not have a grep installation. There are a number of free versions available on the Web. Search using the keywords grep for Windows.
- Open
play.txtfrom the Run Command tutorial project (if it is not already open). - Select the “5 red frogs” and “6 green frogs” lines.
- Select Tools > Run Command.
- In the Run field, enter the command
grep red. - Click Run to remove all but the red frogs.
Using Advanced Options
Clicking the More button in the Run Command dialog box reveals a number of advanced options.

Specifying a Command’s Working Directory
To set the current working directory for a command:
- Select Tools > Run Command. Click More to display Advanced Options.
- In the Run field, enter the command:
dir(on Windows), orls -al(on Linux). - In the Start in field, enter
C:\(on Windows), or/home(on Linux). - Click Run to generate a
C:\directory listing.
Specifying Environment Variables
Specify which environment variables to set for a command. For example, use this feature for setting PERL5LIB or PYTHONPATH when running Perl or Python scripts.
- Select Tools > Run Command.
- In the Run field, enter the command:
set. - Click New to add a new environment variable. For the variable name, enter:
PERL5LIB - Click Add Path to choose a value for
PERL5LIB(the actual value you choose does not matter for this example). Click OK. - Click Run to display all environment variables. Scroll through the results on the Command Output tab until the
PERL5LIBsetting is located.
Running GUI Apps or Running Commands in a Console
Run GUI programs outside of the Command Output tab by changing the Run in option to No Console.
- Select Tools > Run Command.
- In the Run field, enter the command:
mozilla
If the Mozilla browser is not installed on your system, choose another GUI application to run. For example, on Windows, try running either theiexploreornotepadcommand. - From the Run in drop-down list, select No Console (GUI Application).
- Click Run to open the GUI application rather then the Command Output tab.
To run commands in a new console window:
- Select Tools > Run Command.
- In the Run field, enter the command:
dir - From the Run in drop-down list, select New Console.
- Click Run to execute the command and open a new console window.
Saving and Rerunning Commands
Save frequently used commands for quick access and reuse.
Rerunning Recent Commands
Select Tools > Recent Commands > [Command] to rerun recently run commands.
Saving Commands in the Toolbox
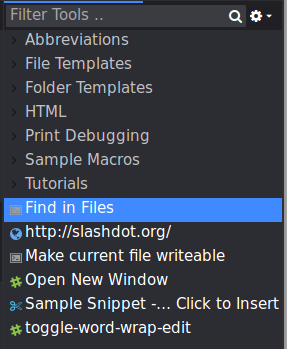
The Run Command dialog box contains an option for saving commands in the Toolbox for reuse. A command saved in the Toolbox is indicated with the ![]() icon.
icon.
- Select Tools > Run Command.
- In the Run field, enter the command:
echo Hello World - Select the Add to Toolbox check box.
- Click Run. Notice that a command named
echo Hello Worldis added to the Toolbox. - Double-click the
 icon next to
 echo Hello Worldto rerun the command.
Editing Saved Command Properties
Edit command properties in the Command Properties dialog box.
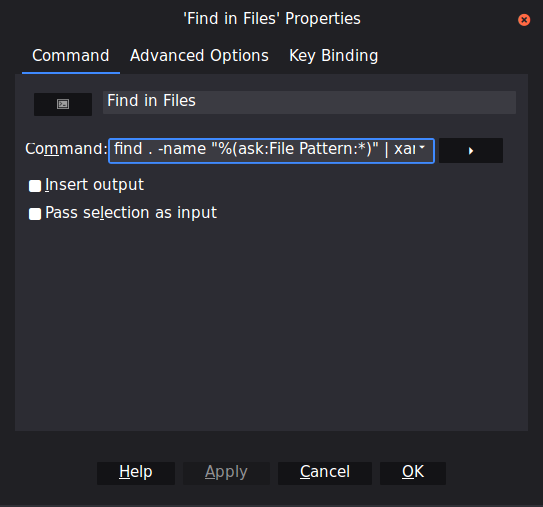
To open this dialog box, right click on any saved command and select Properties.
Using Interpolation Shortcuts
Run Command can use interpolation shortcuts for putting filenames, directory names, paths and other arguments into commands as variables. This creates commands that are more generic and useful. Enter command shortcuts in the Run and Start in fields, or select them from the drop-down lists to the right of the Run and Start in fields. Windows users should enclose all interpolation shortcuts (with the exception of %(browser)) in double quotation marks to ensure that spaces in filenames or file paths are interpreted correctly.
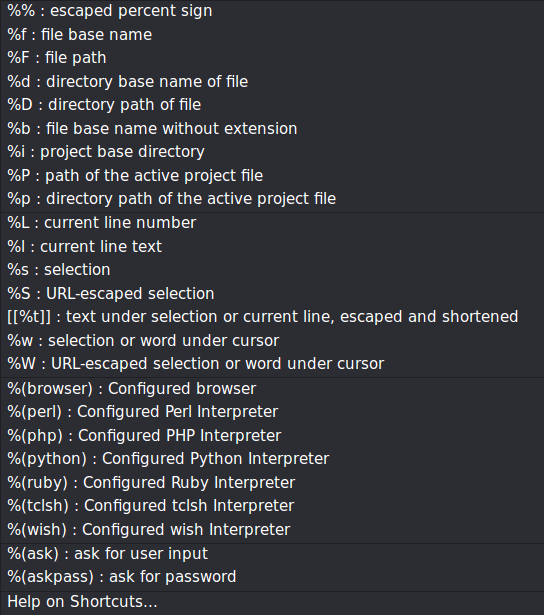
Click the arrow button to the right of the Run field to view a list of Run Command shortcuts.
Shortcuts for the Current File
The string %F in a command expands the full path of the current file.
- In the Projects sidebar, double-click the file
play.txtto open it for editing. - Select Tools > Run Command.
- In the Run field, enter the command:
echo "%F" - Click Run.
Change the current file status from “writable” to “read-only”.
- Open
play.txt(if it is not already open). - Select Tools > Run Command.
- In the Run field, enter the command:
attrib +R "%F"
on Windows, or:
chmod u+w "%F"
on Linux. - Click Run. The result is displayed at the top of the Command Output tab.
To open a current HTML file in a Web browser, combine %F with the %(browser) shortcut.
- In the Projects sidebar, double-click the file
index. - Select Tools > Run Command.
- Click the arrow to the right the Run field to display the shortcuts drop-down list. Select %browser, press the space bar, and then select %F. Enclose the
%Fin double quotation marks. On Mac OS X, you wil have to add ‘open’ at the beginning of the command if Safari is your default browser. - From the Run in drop-down menu, select No Console (GUI Application).
- Click Run.
Shortcuts for the Current Selection
The %s, %S, %w and %W codes insert current selections, or the current word under the cursor, into commands. This shortcut helps when running utilities like grep, or for searching the Web.
- In the Projects sidebar, double-click the file
index. - Position the cursor over the word “PHP” in
index. - Select Tools > Run Command.
- In the Run field, enter the command:
%(browser) http://www.google.com/search?q="%W". - Select the Add to Toolbox check box to save this command.
- Click Run to search for “PHP” with Google.
Now that you have searched for a word or selection in Google, try the following shortcut to search for PHP methods.
- Open
index. - Select the text
mysql_info methodsin the file. - Select Tools > Run Command.
- In the Run field, enter the command “
%(browser) http://www.php.net/manual-lookup.php?pattern=%S”. - Select the Add to Toolbox check box to save this command.
- Click Run to search
mysql_info methodsin PHP’s online manual.
These two commands are built into Komodo. If the default key binding scheme is in effect, ‘Ctrl’+‘F1’ (‘Cmd’+‘Ctrl’+‘/’ on macOS) starts a Google search for the current selection. ‘Shift’+‘F1’ (‘Cmd’+‘/’ on macOS) in a Perl, Python or PHP file starts a help search appropriate for that language. Customize searches in the Preferences dialog box (Edit > Preferences|Language Help).
Using Shortcuts for a Command’s Directory
Run commands from the directory where the current file is stored, rather then the current directory. For example, use the command %(perl) "%F" to run the current file with a configured Perl interpreter.
- In the Projects sidebar, double-click the file
hello.pl. - Select Tools > Run Command.
- In the Run field, enter the command:
%(perl) "%F" - In the Start in field, enter:
"%D" - Click Run.
This example assumes a perl interpreter is configured on your system. If a perl interpreter is not configured (the required file is perl.exe), an error message displays at the top of the Command Output tab. Alternatively, run the command dir (Windows) or ls (Linux) to display a list of files and folders beneath the current directory.
Prompting for Input
Introduction
Run Commands can prompt for specific input with a dialog box. These queries can be configured with default values and/or prompt the user if no value could be determined automatically (e.g. a command to search Google for the current selection that prompts for a search term if nothing is selected).
The %(ask) and %(askpass) shortcuts always prompts the user for data. Other shortcuts can use the orask modifier to prompt the user if no valid value could be determined.
Windows users should enclose all Komodo shortcuts (with the exception of %(browser)) in double quotation marks. This is necessary to ensure that any spaces in filenames or file paths are interpreted correctly.
Always Prompting with %(ask) or %(askpass)
The full syntax of %(ask) and %(askpass) shortcut are:
%(ask[:NAME:[DEFAULT))
%(askpass[:NAME:[DEFAULT))
where NAME is an optional name to use when prompting in the dialog box and DEFAULT is an optional default value to place in the dialog box.
For example:
- Select Tools > Run Command.
- In the Run field, enter the command:
echo Your favorite number is "%(ask)" Click the Run button to run the command. The Interpolation Query dialog box is displayed.
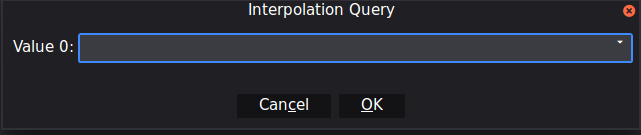
Enter your favorite number and click OK to finish running the command.
Refine this shortcut by adding a more meaningful name than “Value 0” and a more appropriate default value.
- Select Tools > Run Command.
- In the Run field, enter the command:
echo Your favorite number is "%(ask:Fav Number:42)" Click the Run button to run the command. The Interpolation Query dialog box will now look like this:
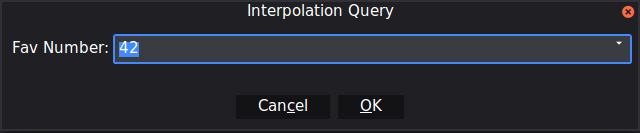
If your favorite number does not happen to be 42, enter a different number and click OK to finish running the command.
Prompting When Necessary with %(…:orask)
Any Run Command shortcut can be modified to prompt the user for a value if one cannot be determined automatically. The full syntax of the modified shortcut is:
%(SHORTCUT:orask[:NAME])
where NAME is an optional name to use when prompting in the dialog box.
In the previous step we created a shortcut to search for the selected word on Google with the command:
%(browser) http://www.google.com/search?q="%W"
However, if nothing has been selected and there is no word under the cursor, the command fails. In this case, it would be better if the command prompted you for a search term.
- Be sure your cursor is not positioned over a word.
- Select Tools > Run Command.
- In the Run field, enter the command:
%(browser) http://www.google.com/search?q="%(W:orask:Search for)" - Click Run. The Interpolation Query dialog box prompts for a search term.
Parsing Command Output
Introduction
Use Run Commands to specify a regular expression to parse filename and line number information from lines of output. The parsed results are displayed in a table to quickly identify the desired file. Explore this usage by creating a “Find in Files” command later in this section.
Parsing Output with a Regular Expression
Output from a run command can be parsed with a Python regular expression and displayed in the Command Output tab as a list.
Tip: Use the Komodo Regular Expression (Rx) Toolkit to build, edit, or test regular expressions.
Named groups in Python regular expressions (e.g. (?P<_name_>_pattern_) ) can be used to sort match data. The names ‘file’, ‘line’, ‘column’ and ‘content’ can be used as column titles in Parsed Output mode, with the matching text displayed in the columns under the names.
For example, the output of the “Find in Files” example below contains the following:
hello.pl:5:print "Hello, frogs!\n";
Output lines are of the form:
<file>:<line>:<content>
An regular expression to match the important elements of this line could be:
(.+?):(\d+):(.*)
However, to view this information as a useful list, we need to define the column headings by naming the groups:
(?P<file>.+?):(?P<line>\d+):(?P<content>.*)
When parsing the run command output, Komodo determines that hello.pl is the file, 5 is the line and print "Hello, frogs!\n"; is the content, and displays the output sorted into the appropriate columns:
Parts of the output that match outside the named groups in the regular expression (e.g. the “:” delimiters seen above) are visible when viewed as raw output, but are hidden when viewed as a list. You can use this technique to filter out extraneous information when viewing output as a list.
For example, if you were not interested in viewing the line number of the match, you could change the regular expression to the following:
(?P<file>.+?):\d+:(?P<content>.*)
Komodo can use the information from the ‘file’ and ‘line’ groups to open a file in an editor tab at a particular line (see below).
Using “Find in Files”
Create a “Find in Files” command using all information presented in this tutorial.
- In the Projects sidebar, double-click the file
hello.pl. - Position the cursor over the word frogs.
- Select Tools > Run Command.
On Windows, enter the command:
findstr /s /n /c:"%(w:orask:Search Term)" "%(ask:File Pattern:*.*)"
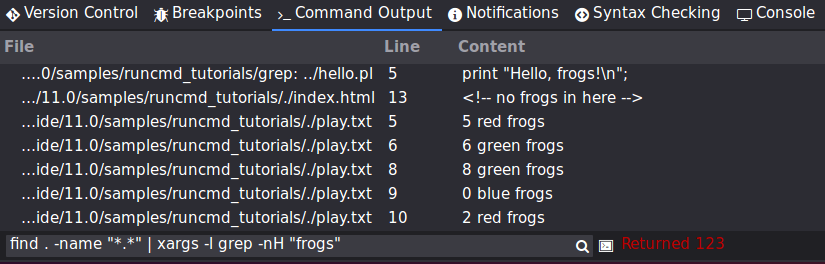
Or on Linux enter the command:
find . -name "%(ask:File Pattern:*)" | xargs -l grep -nH "%(w:orask:Search Term)"Note that findstr is a Windows command line utility that searches for strings in files.
Select the Add to Toolbox check box to save this command.
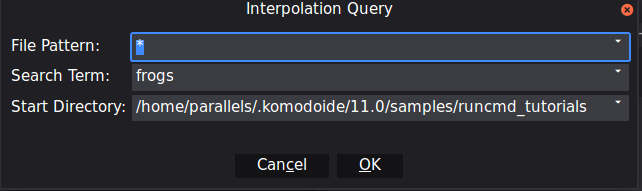
In the Start in field, enter:
%(ask:Start Directory:%D)
(When the command is run, Komodo should prompt for the “Start Directory” using the directory of the current file, or%Das the default value).Select the Parse output with check box and enter:
^(?P<file>.+?):(?P<line>\d+):(?P<content>.*)$
as the regular expression with which to parse.Select the Show parsed output as a list check box.
Click Run. The Interpolation Query dialog box is displayed.
Click OK to run findstr. A list of all occurrences of “frogs” in the files of the Run Command tutorial project is displayed on the Command Output tab.
Double-click on a result to jump to a specific file and line.
Click the Toggle Raw/Parsed Output
button to see the raw output instead.