Editing
Komodo’s editor has extensive code intelligence features for JavaScript, Node.js, HTML, XML, XSLT, Perl, PHP, Python, Ruby, and Tcl. Komodo provides syntax highlighting and common editor features for most other programming languages. Many of these features can be customized in Komodo’s editor preferences.
Right-clicking in the editor pane brings up a context menu with common editing functions. In addition to standard Cut, Copy, Paste, Select All, and Print commands, the following options are available:
- Add as Snippet in Toolbox: Stores the selected code in the Toolbox.
- Disable/Enable Breakpoint: Toggles a breakpoint between enabled, disabled, or deleted states. Komodo IDE only.
- Add/Edit Breakpoint: Adds or edits a conditional breakpoint. Komodo IDE only.
- Add/Edit Spawnpoint: Adds or edits a Tcl spawnpoint on the line where the cursor is positioned Komodo IDE only.
- Go to Definition: Jumps to the corresponding definition of the code object currently under the cursor. See Go to Definition.
- Jump to Corresponding Line: When viewing changes in a diff file, jump from the current line in the diff to the corresponding line in the the source code.
- Toggle Bookmark: Insert or remove a bookmark.
- Show Unsaved Changes: Opens a window showing changes made to the file since the last time it was saved (in unified diff format). Press F8 to jump to the next change, F7 to jump to the previous change, F9 jump to a highlighted change in the original file, and Esc to close the window.
- Format Using: Opens a sub-menu showing configured code formatters. (Komodo IDE only)
- Refresh Status: Refresh the current file’s status. See Customizing File Settings for more information.
- Source Control: Opens a sub-menu with source code control commands. Available only for files under version control Komodo IDE only.
- Properties and Settings: Select to adjust the properties and settings of the current file.
Clipboard Manager
Komodo includes the ability to selectively choose from text selections you have previously cut or copied, in addition to the standard copy an paste behavior that pastes the most recent text you cut or copied.
Note: The Clipboard Manager is only available after you have cut or copied multiple areas of text.
- Navigate to the line in the editor where you want to paste text.
- Press
Ctrl+Shift+v. - Use the up and down arrows to select the text to paste and press
Enter.
Language Support
Syntax Coloring and Indentation
The Komodo editor is language-sensitive. When you open a file in a supported language, Komodo will color the syntax, format indentation, and provide indentation guides.
More Information:
- Customizing Fonts and Colors
- File Associations
- Viewing the Current File as Another Language
- Extending the Syntax Checker
- Customizing Indentation
Background Syntax Checking
As you write code in Komodo, it periodically checks for syntax errors. Syntax errors are underlined with a red wavy line; syntax warnings are underlined with a green wavy line. Komodo uses the language interpreter’s own error-checking functions, so there may be slight differences in the way that syntax errors are detected and displayed depending on the version of the interpreter.
The syntax checking icon in the status bar displays the syntax status of the current file displayed in the Editor Pane:
- A green check mark over the icon indicates that the language interpreter does not detect any warnings or errors in the program.
- A red exclamation mark over the icon indicates one or more errors. To see the number of errors and warnings contained in the program, hover your mouse pointer over the syntax checking icon. A pop-up tool tip will display the total number of errors and warnings.
- An hourglass over the icon indicates that syntax analysis is in progress.
You can view the error message from the interpreter in the status bar if the editing cursor is on the same line as the error. If it is not, hover the mouse pointer over the error and the interpreter error will be displayed in a pop-up tool tip.
To move the editing cursor to the line containing the error or warning, double-click the syntax checking icon. If there are multiple errors or warnings, each time you double-click the icon, the editing cursor will move to the next error.
If background syntax checking is disabled in Preferences, shift-click on the syntax checking icon to check the syntax of the file.
Clicking on the syntax checking icon in the status bar brings up the context menu.
- Check syntax now (same as shift-click)
- Jump to next result (same as double-click)
- Clear warning/error squigglies
- Show Syntax Checking Panel
Komodo supports background syntax checking for the following programming and template languages:
- ActiveScript
- CSS (Less and SCSS)
- HTML
- HTML5
- JavaScript (CoffeeScript if installed)
- JSON
- Node.js
- Perl
- Python
- Python3
- Ruby
- Tcl
- XBL & XUL
- XML
- XSLT
- Django
- EJS
- epMojo
- Lua
- Mason
- RHTML
- Smarty
- TemplateToolkit
More Information:
- Syntax checking: Preferences > Editor > Smart Editing
AutoComplete and CallTips
Autocomplete and calltips are two related features to help you write code more efficiently.
Autocomplete presents a pop-up list of relevant choices at certain trigger points as you are editing a document. Autocomplete functionality varies according to language; for example, Python autocomplete lists object methods when you type the ‘.’ (period) trigger character, Perl autocomplete lists available sub-packages when you type the ‘::’ trigger string in a “use” statement, and XSLT autocomplete lists appropriate element and attribute names when starting XML tags.
Use the arrow keys to scroll through the list; use the ‘Tab’ or ‘Enter’ key to insert the currently selected item into your document; use the ‘Esc’ key to cancel the pop-up list.
A calltip presents you with a call signature for, and possibly a short description of, a function or method call.

Generally, a calltip is opened when you enter the open parenthesis, “(”, of a function call. However, this varies according to language. Use the ‘Esc’ key to close the calltip.
Komodo includes autocomplete and calltip support for several languages. Language-specific functionality for each supported language is described below.
More Information:
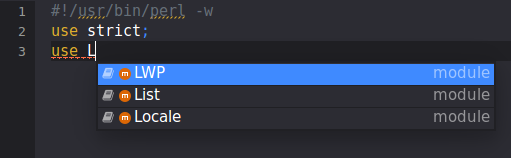
Perl AutoComplete and CallTips
Komodo supports the following types of Perl autocomplete and calltips:
- Autocomplete for sub-modules in
usestatements: Available sub-modules are listed upon entering “::” inuseandrequirestatements. For example:
use LWP::|
- Autocomplete for sub-modules, subroutines, and variables: Sub-modules, subroutines, and variables are listed upon entering “::” in a fully qualified Perl name. For example:
use LWP;
    $HTTP::Request::|
- Autocomplete for module subroutines: Subroutines are listed upon entering “->” after a module name. For example:
use LWP;
    LWP::UserAgent->|
- Autocomplete for object methods: Object methods are listed upon entering “->” after an object reference. For example:
use Data::Dumper;
    my $d = Data::Dumper->new($foo);
    $d->|
- Calltips for subroutine calls: A calltip is shown for subroutine and object method calls upon entering “(” after a sub-routine name, if information is available for that subroutine. Note: Perl supports subroutine calls without the parentheses. Komodo only triggers a calltip without the parentheses for certain built-in Perl functions such as, “chdir”, “split”, “join”, etc.
A Perl autocomplete list or calltip can also be explicitly initiated by typing ‘Ctrl’+‘J’ (‘Cmd’+‘J’ on Mac OS X).
Python AutoComplete and CallTips
Komodo supports the following types of Python autocomplete and calltips:
- Autocomplete for object methods and attributes: Object methods and attributes are listed upon entering “.” after an object reference. For example:
import sys
    sys.|
This also applies to strings. For example:
"This is a string".|
- Autocomplete for
importstatements: Modules are listed after animportorfromstatement. Available members (i.e. sub-modules, variables, functions, and classes) are listed after afrom ... importconstruct. For example:
from sys import |
- Autocomplete for PythonDoc tags: Tags are listed upon entering “@” at the beginning of a comment line. For example:
##
    # This is the description.
    # @|
- Calltips for function calls: A calltip will be shown for function and object method calls upon entering “(” after the function name – if information is available for that function.
A Python autocomplete list or calltip can also be explicitly initiated by typing ‘Ctrl’+‘J’ (‘Cmd’+‘J’ on Mac OS X).
Ruby AutoComplete and CallTips
Komodo supports the following types of Ruby autocomplete and calltips:
- Autocomplete for
requirestatements: Available Ruby libraries are listed upon entering the opening quote and for slashes in the quotes. For example:
require '| require 'net/|
- Autocomplete for available attributes on a class or module namespace: Available methods, constants and sub-modules are listed upon entering “::” in a fully qualified Ruby name. For example:
class Animal
        def initialize(species)
            @@species = species
        end

        def grunt
            "ugh"
        end

        def run
        end
    end

    Animal::|
- Autocomplete for methods on an class instance: Available methods on an instance are listed upon entering “.”. For example:
a = Animal.new("dog")
    a.|
- Calltips for method calls: The method signature (and possibly some method documentation) is shown in a calltip upon entering the “(” for a method call.
a = Animal.new(|"dog")
A Ruby autocomplete list or calltip can also be explicitly initiated by typing ‘Ctrl’+‘J’ (‘Cmd’+‘J’ on Mac OS X).
PHP AutoComplete and CallTips
Komodo supports the following types of PHP autocomplete and calltips:
- Classes and Methods: Classes in the current file, and classes in any included files, are displayed upon entry of the keyword “new”. Methods for a class instance are displayed after you enter “->” on the instance variable or alternatively if the scope is inside the class you will get completions after “this->”, “self::“, “parent::” operators. Static and constants are displayed after you enter “::” after a class name.
class Student {
    const UNIVERSITY = "Pluto";
    var $id = "";
    var $name = "";
    function Print() {
      echo "Id: " . $this->id . " Name: " . $this->name . "\n";
    }
}
$student1 = new Student();
$student1->name = "Student 1";
$uni = Student::UNIVERSITY;
- Functions: Standard PHP functions and functions defined within the script (and within any included files) are displayed after you have typed three characters that match one or more function names. Function calltips are displayed after the opening parentheses “(” on a function call.
phpinfo();
            phpversion();
- Constants: PHP constants are included with the functions list triggering after three characters have been typed.
echo "Filename is: " . __FILE__ . "\n";
- Variables: Variables declared in the current file, or in any included files, are displayed when you enter the symbol “$” followed by one letter.
$student1 = new Student();
            $s|tudent1->name = "Student 1";
Tcl AutoComplete and CallTips
Komodo supports the following types of Tcl autocomplete and calltips:
- Autocomplete for command names: A list of matching Tcl commands is displayed after you have typed three characters in a command. For example,
str|
- Calltips for command arguments: A calltip is displayed for a Tcl command upon entering ‘ ’ (space) after the command name. For example,
string is alpha |
Tcl autocomplete and calltips use the built-in function definitions contained in Tcl .tip files, which are in the lib/support/tcl subdirectory of the Komodo installation directory.
Windows
<komodo-install-directory>\lib\support\tcl
Linux
<komodo-install-directory>/lib/support/tcl
Mac OS X
<komodo-install-directory>/Contents/SharedSupport/tcl
Edit the .tip files to customize or extend Tcl autocomplete and calltips in Komodo. Review the existing .tip files for examples before editing.
XSLT AutoComplete
Komodo supports the following types of XSLT autocomplete:
- Autocomplete for XSLT elements: A list of appropriate elements in the XSL-namespace for the current context is supplied upon entering “<” to start a tag.
- Autocomplete for XSLT attributes: A list of appropriate attributes in the XSL-namespace for the current element is supplied upon entering ‘ ’ (space) in a tag.
- Autocomplete for end-tags: A one item list containing the appropriate closing tag for the current position is supplied upon entering ‘</‘.
- Autocomplete for output: A list of elements and attributes for HTML or XML output (as defined in the
methodattribute of thexsl:outputelement) is supplied upon entering “<” withinxsl:templateblocks. If the output method is a specific dialect of XML, specifying thepublicIdorsystemIdof that dialect in thedoctype-publicordoctype-system(respectively) enables autocompletion appropriate to that dialect.
XML AutoComplete and CallTips
Komodo supports XML autocomplete and calltips for basic XML as well as a a number of XML dialects, including:
- HTML
- XHTML
- SGML
- RELAX
- RELAX NG
- RDF
- MXML
- XML Schema
- Atom
- Dublin Core
- DocBook
- WAP
- XSLT
- VXML
- SVG
- MathML
- XBL
- XUL
- XML Catalog
Support for additional XML dialects can be configured by adding an XML Catalog for the dialect in the SGML/XML Catalogs section of the Code Intelligence Preferences.
Komodo supports the following types of XML autocomplete:
- Autocomplete for elements: A list of elements available in the current namespace is supplied upon entering “<“. If the current document’s XML dialect is not recognized (i.e. it is not in the above list or in a configured catalog), the completion list is drawn from elements used in the document.
- Autocomplete for attributes: A list of attributes available within in the current element is supplied upon entering a space after the element name.
- Autocomplete for end-tags: A list (of length one) to close the current tag is supplied upon entering ‘</‘.
If the document does not have an XML declaration, autocomplete will default to XHTML 1.1. The DOCTYPE and namespace can be manually set under File Properties.
CSS, Less, and SCSS AutoComplete
Komodo supports the following types of CSS, Less, and SCSS autocomplete:
- Autocomplete for id names: A list of id selectors declared in the current file and any CSS, Less, or SCSS files in the current file’s directory and subdirectories.
- Autocomplete for class names: A list of class selectors declared in the current file and any CSS, Less, or SCSS files in the current file’s directory and subdirectories.
For CSS in particular, completions are available for CSS embedded in HTML, PHP, RHTML, etc. documents. For example:
<html>
    <head>
        <style type="text/css">
            #header { /* ... */ }
            #footer { /* ... */ }
            .content { /* ... */ }
        </style>
    </head>
    <body>
        <div id="|header"></div>
        <div class="|content"></div>
Variable Highlighting
Komodo will automatically highlight variables that you click on, as well as highlighting all other occurrences of this variable. This is extremely useful in distinguishing where you have used a particular variable. Note that this only works for languages that use variable styling (that’s most languages).
You will also be able to trigger this variable highlighting manually using a command key binding, which you can configure through the Komodo key binding preferences.
Soft Characters
With Enable soft characters selected in Komodo’s editor preferences, typing one of “[” “{” “(” will put the matching, highlighted closing character to the right of the cursor. The highlighting indicates that it’s a “soft” character. If you move over the soft character with navigation keys or move to a new cursor position outside of the delimiters with the mouse, the soft characters become fixed (i.e. are inserted as normal text). You can also “type over” soft characters. For example:
object.method(value|)
Hitting the right arrow key or typing a “)” results in:
object.method(value)|
In most programming languages, typing a string-start character in a “default” context (i.e. not in a string or comment), will generate the appropriate soft quote to the right of the cursor. Komodo is aware that in some languages characters like single-quote are used to start a comment, so no soft character is generated.
Cursor movement (e.g. moving over the soft character with the right-arrow) “hardens” soft characters.
Fast Characters: Hopping Over Soft Characters
When a line ends with soft characters, typing a supported Fast Character will skip over them, and do the expected thing. Pressing Tab always moves to the end of the line. In many languages, pressing ; moves over some of the soft characters, and deposits the ; on the right hand side of the run of soft characters. For example, in the following PHP code:
f(strlen(s|))
pressing ; results in the following situation:
f(strlen(s));|
Notice that the right-hand closing parentheses are no longer soft.
Komodo also doesn’t hop when ; is typed in C-style for loops.
(Erlangers are welcome to substitute . for ; in the above discussion.)
Viewing the Current File as Another Language
Komodo’s syntax coloring, background syntax checking, and indentation are language-specific. However, Komodo provides the option to view a file as another language. This is useful when you open, for example, a Perl file that has no extension. You can select the Perl language option, then edit the file as a regular Perl file. Komodo’s File Associations do not allow you to set a language association with a file that doesn’t have an extension.
To view the current file as another language:
- On the View menu, select View as Language.
- From the list, select the desired language.
If you have opened a file that does not have a file association specified in the Preferences dialog box, Komodo displays the file as text. You can select to view the file as another language, but Komodo does not remember again. If you will be working with a new type of file, it is recommended that you specify a file association.
For example, if you open a DocBook (*.docb) file in Komodo, it does not have XML syntax coloring. Specify a file association to tell Komodo to open *.docb files as XML files. For more information on specifying file associations, see Customizing File Associations.
If you choose to view a file in a different language and then save the file, the original language will not be restored when you re-open the file. If you are unsure of the original language, you can select View > View As Language > Reset to best guess. Komodo will ignore the user preference, and analyze the file in an attempt to determine its language.
Commenting Blocks of Code
The commenting function is used to convert a single line or a group of lines into a comment, with the syntax appropriate for the file’s language. Komodo supports commenting for the following languages:
More Information:
Manipulating Code
Cutting and Copying Lines
When no text is selected, the Cut and Copy commands operate on the entire line. For example, pressing ‘Ctrl’+‘X’ while editing a line will cut the entire line even though there is no selection. Note: This behavior also applies to blank lines.
Copying or cutting lines repeatedly from the same cursor position adds each line to the clipboard rather than overwriting the previous clipboard contents.
Selecting and Dragging Lines
If the line number column is displayed, lines can be selected by clicking on the line number. To select multiple lines just drag the mouse up or down.
To drag a single line, click the line number, then click and drag the selection to the desired location. The same operation can be done with multi-line selections.
Automatically Repeating Keystrokes
Komodo can repeat a single keystroke for a given number of characters. To have Komodo repeat a key sequence a specified number of times:
- Select Code > Repeat Next Keystroke N Times. The status bar at the bottom of the Komodo workspace prompts you for the number of times the keystroke will be repeated.
- Type a number using only numeric characters.
- Enter the keystroke. The results of the sequence are displayed in the Editor Pane the specified number of times.
Indenting and Un-indenting Lines of Code
To indent a single line or a selected block of code:
- Single Line: Position the cursor at the start of the text on the desired line. Press Tab, or select Code > Indent.
- Multiple Lines: Select the desired lines by clicking and dragging in the Editor Pane. Press Tab, or select Code > Indent.
To un-indent a single line or a selected block of code:
- Single Line: Position the cursor at the start of the text on the desired line. Select Code > Dedent or use the associated key binding.
- Multiple Lines: Select the desired lines by clicking and dragging in the Editor Pane. Select Code > Dedent, or use the associated key binding.
Specify the number of spaces per tab in the Indentation Editor Preferences (Edit > Preferences > Editor > Indentation).
Reflowing Paragraphs
To reformat a section of code so that it is left-aligned and displays within the Edge line column, select the section of code to be reflowed, and then select Code > Reflow Paragraph. Alternatively, use the associated key binding.
Formatting Code (Komodo IDE only)
Komodo offers integrations with external code formatters. Selected text, or an entire document can be passed to the formatter, processed, returned via stdin and reinserted in the buffer. You can add or edit code formatters in the Code Formatters preferences.
To use a formatter on the current buffer:
- Select the formatter from the list under Code > Format Using. The first sub-menu shows the formatters available based on Komodo’s language detection. Additional formatters are available under the Other Formatters sub-menu.
- Use the Editor: Format Code or Text command (‘cmd_format’). Komodo will run the formatter on the selection if there is one. If there is no selection, the entire document will be formatted. By default, this command does not have a key binding; you can assign one in the Key Bindings preferences.
Note: Komodo uses HTML Tidy as the default formatter for HTML documents. Since this parser cannot differentiate between isolated sections of HTML and complete documents, use Tidy Fragment when formatting selection and Tidy Document when formatting the entire file.
Joining Lines
To cause two lines of code to display on the same line, position the cursor in the first of the two lines, and select Code > Join Lines. The second line is joined with the first line.
Converting between Uppercase and Lowercase
To convert a selection of text from uppercase to lowercase (or vice-versa), from the Code menu, select Make Uppercase or **Make Lowercase
**, or use the associated key binding.
Transposing Characters
To reverse the position of the two characters to the left of the editing cursor, use the associated key binding.
Literal Characters
To insert literal characters into the editor, select Code > Enter Next Character as Raw Literal, and then enter the key or key combination representing the literal character. (Alternatively, use the associated key binding.) For example, to insert a form feed, enter ‘Ctrl’+‘L’. The following characters are common:
- Ctrl+L: Form Feed (shown as “FF”)
- Esc: Escape character (shown as “ESC”)
- Return or Ctrl+M: Carriage Return (shown as “CR”)
- Ctrl+J: Line Feed (shown as “LF”)
- Tab or Ctrl+I: Tab (shown as “—->”)
Commenting and Un-commenting Lines or Blocks of Code
To comment a single line of code, place the cursor on the desired line, then, from the Code menu, select Comment Region. Alternatively, use the associated key binding.
To un-comment a line of code, place the cursor is on the desired line, then, from the Code menu, select Uncomment Region. Alternatively, use the associated key binding.
To comment a block of code, select the lines you wish to comment by clicking and dragging the mouse in the Editor Pane. Then, from the Code menu, select Comment Region. Alternatively, use the associated key binding.
To un-comment a line of code, place your cursor is on the desired line, then, from the Code menu, select Uncomment Region, or use the associated key binding.
Cleaning Line Endings
If a file contains line endings for more than one platform, you can replace the unwanted line endings with the line endings specified in file’s Properties and Settings dialog box.
- On the View menu, click View EOL Markers to show line endings.
- Select the line(s) for which you want to replace the endings.
- On the Code menu, click Clean Line Endings. The line endings are replaced with the line endings specified in the file’s settings.
Tabifying and Untabifying Regions
“Tabifying” a region converts leading spaces to tabs. If you select a line of code that has some leading spaces and you choose to tabify the region, you convert all the leading spaces into Tab characters. The Tabify region dialog box sets the ratio of space characters to Tab characters. If you select 8, then each 8 space characters will be represented as 1 Tab character.
To tabify a region:
- From the Code menu, select Tabify Region.
- In the dialog box, set the number of spaces, from 1 to 16, to apply to a tab.
Click OK or press Enter.
To untabify a region:
- From the Code menu, select Untabify Region.
- In the dialog box, set the number of spaces, from 1 to 16, to apply to a tab.
- Click OK or press Enter.
To illustrate tabifying, follow this procedure:
- Open the sample_project.kpf.
- Open perl_sample.pl.
- Turn on the Line Numbers.
- Turn on the Whitespace characters.
- Find the following line:
$sum += $prices[$i];There are four leading spaces on this line. You can tabify this line and convert each space character into one Tab character. - Tabify this line. Set the number of spaces to 1. This means each space character will be converted to one Tab character.
- Now this line has four Tab characters, represented as right arrows, preceding
print $sum += $prices[$i];. This causes the line to be indented too far. - Untabify this line. Set the number of spaces to 1. This returns the line to the original state.
Now look at another line with 8 leading spaces.
- Open python_sample.py
- Find the following line:
print "element %s is a string" % element. There are 8 leading spaces on this line. - Tabify this line. Set the number of spaces to 8. This means the 8 spaces will be converted to one Tab character.
- Now this line has one Tab character, represented as a right arrow, preceding
print "element %s is a string" % element;. This does not change the line’s indentation. - Untabify this line. Set the number of spaces to 8. This returns the line to the original state.
You can set the width of Tab characters in the Preferences dialog box. The default value is 8.
Column / Rectangular Selection
Rectangular selection is useful in selecting columns and other space or tab delimited text.
| Platform | Via Mouse | Via Keyboard |
|---|---|---|
| Windows | Alt+left-click + drag | Alt'+Shift + direction key |
| macOS | Alt/Option+left-click + drag | Ctrl+Shift + direction key |
| Linux | left-click + drag, then tap Alt | Alt+Shift + direction key |
Cut, Copy, Paste and Delete commands will operate on the highlighted block.
Note: On Linux, the default key bindings may conflict with ones used by the window manager. To avoid this, re-map the “Editor: Select Rectangular…” commands in the Key Binding Preferences to unused key combinations.
Column Editing
Once a rectangular selection has been made, text insertion will operate on each line of the selection; the characters will be duplicated on all selected lines.
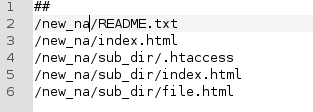
For example to change “directory-name” in the file list below, select the column containing that name as described above.
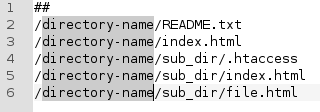
Once the column is selected, begin typing. The cursor will appear only at the top line of the selection, but the new text will appear on all subsequent lines within the column selection.
Click the mouse or press any direction key to exit column editing mode.
Note: Column selections in areas beyond line endings will not appear correctly. The areas beyond the end of line will not be highlighted, but column editing will still work. Text will be inserted immediately after the longest line in the selection.
With Vi emulation enabled, mouse selection and Vi visual blockwise selection (‘Ctrl’+‘V’) will not trigger column editing. While in Input mode, use ‘Alt’+‘Shift’ with the direction keys to make the column selection, and ‘Esc’ to exit column editing mode.
Multiple Carets
The Komodo editor lets you modify text at more than one point in a document by setting multiple selections and/or carets (zero-length selections). Ctrl-Click and Ctrl-Select adds new carets and selections, respectively. All subsequent edits and movements are applied to each caret in the selection, similar to column editing mode.
Pressing ‘Esc’ exits the multi-caret session, returning to standard editing mode. Additionally, in editing mode, clicking the mouse also exits the session.
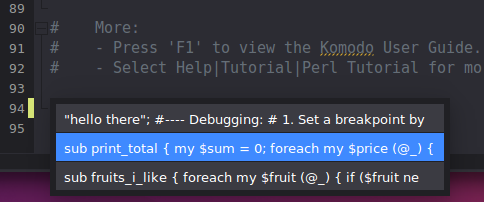
Completing Words
The Komodo editor maintains an index of words in the current file. Rather than re-entering words that already exist in the current file, use the Complete Word feature to finish words.
Enter one or more characters, then select Code > Complete Word, or use the associated key binding. Words are completed based on the most recent occurrence in the current file. For example, if you type “pr”, Komodo searches backward from the insertion point to find the first instance of a word that begins with “pr”. Repeating the keybinding will cycle through all possible completions for the word. The Complete Word feature is case sensitive.
Selecting Blocks of Code
Quickly select blocks of code using Komodo’s Select Block function (Edit > Select > Select Block, or use the associated key binding). This function uses the Code Folding logic.
When the Select Block function is invoked, Komodo analyzes the cursor position relevant to the blocks of code in the document. If the cursor is within a block, the entire block will be selected. (If the cursor is within a nested block, only the current sub-block will be selected, not the block that contains the entire nested structure.) If the cursor is not inside a block, the entire document will be selected.
Quickly Renaming Start- and End-Tags
In any markup language based on HTML or XML, you can rename the element name in a start-tag and its matching end-tag simultaneously by selecting either tag with the keyboard or mouse. Komodo highlights both instances of that tag (even if one of them is scrolled off screen) in multi-caret selections, so all changes are applied to both instances. Pressing ‘Esc’ exits the editing session, returning to standard editing mode.
This only changes a single pair of tags. If you want to change the name of all instances of a particular element, using Find and Replace would be better.
Editor Display Characteristics
Toggling Whitespace On and Off
Whitespace is any space in a file not taken up by text. Line breaks, spaces, and tabs are considered whitespace.
To toggle whitespace on and off, select View > View Whitespace, or use the associated key binding.
To set a default for whitespace display, see Customizing Editor Features for more information.
Toggling Indentation Guides On and Off
Indentation guides display vertical lines in the Editor Pane that indicate the number of whitespace indents. The width of indentation guides is determined by the value in the Indentation Width preference. See Customizing Indentation for more information.
To toggle indentation guides on and off, select View > View Indentation Guides, or use the associated key binding.
Toggling Line Numbers On and Off
Line numbers can help orient you when working in a long file.
To toggle line numbers on and off, select View > View Line Numbers, or use the associated key binding.
To set this option globally, see Customizing General Editor Features for more information.
Toggling EOL (end of line) Markers On and Off
End-of-line markers indicate where and how a line ends, such as by a hard return or another key. If you use Enter to end a line, the EOL marker could be CR or CR+LF.
To toggle EOL markers on and off, select View > View EOL markers, or use the associated key binding.
To set this option globally, see Customizing General Editor Features for more information.
Increasing and Decreasing the Code Font Size
To increase the font size in the Editor Pane, select View > Font, and then Increase or Decrease. Alternatively, use the associated key binding. Repeat until the font size is appropriate. The size specification applies to all files open in the Editor Pane.
When you save a file, the new font size is saved.
Toggling Fixed and Non-Fixed Width Fonts
In Komodo, you can use fixed width or non-fixed width fonts for editing. You can also toggle between these settings. The default font is non-fixed width. Note that this setting does not persist. If you toggle to a different setting, the next time you open the file it will restore the width specified on the Fonts tab of the Fonts and Colors page in Komodo Preferences.
To toggle between fixed and non-fixed width font:
- On the View menu, select Font, then Toggle Fixed/Proportional Fonts. This changes the font to fixed width.
- Repeat to reverse.
Folding and Unfolding Code
Code folding symbols appear in the left margin of the Editor Pane immediately left of the line of code that is or can be folded. Minus signs indicate the beginning of a block of code that can be collapsed or folded. Plus signs indicate the beginning of a block of code that can be expanded or unfolded. This line of code is also underlined.
Either specific code blocks or all code blocks can be folded.
To collapse or fold a single block of code:
- Click the minus sign immediately to the left of a block of code
or - On the View menu, select Fold, then **Collapse
** or - Use the associated key binding.
To collapse or fold all foldable blocks of code:
- On the View menu, select Fold, then **Collapse All
**
All foldable blocks of code collapse and the minus signs all become plus signs.
To expand or unfold a single block of code:
- Click the plus sign immediately to the left of a block of code
or - On the View menu, select Fold, then **Expand
** or - Use the associated key binding.
To expand or unfold all foldable blocks of code:
On the View menu, select Fold, then Expand All
All foldable blocks of code expand and the plus signs all become minus signs.
Navigating Within Files
Moving to a Specific Line
While editing, you can move to a specific line number as follows:
- On the View menu, select Goto Line.
- In the dialog box, enter the line number, or, to move backward or forward from the current line enter “+” or “-” in front of the number. For example, enter “+5” to move five lines ahead.
- You can also specify a column to go to, by putting “,”, an optional “+” or “-”, followed by a column count, after the target line number. For example, “+5,-3” will move five lines ahead, and then five columns to the right of the starting column.
- If you leave the initial line number off, you can move by column on the current line. For example, “,+40” will move 40 columns to the right on the current line.
- Click Goto Line or press Enter.
Go to Definition
You can jump to the definition of a code object under your cursor (e.g. a variable, a subroutine, a module, etc.) in any of the following ways:
- Select Navigation > Go to Definition
- Right-click to bring up the context menu and select Go to Definition
- Typing ‘Ctrl’+‘K’,‘Ctrl’+‘G’
Alternatively, double-click the symbol node for the object in the Code Browser tree.
Objects defined within the file, in user-defined modules, and in the site library are accessible in this way; objects defined in a language’s standard library are not.
In Rails applications, you can also jump to symbol definitions in models from controller files.
Bookmarks and Marks
Bookmarks are points of interest in a file. Komodo displays blue triangles on the left margin beside bookmarked lines. Marks, which are derived from the Emacs editor, are similar to bookmarks. The key difference is that marks have no graphical representation in Komodo. Marks make it possible to create an invisible reminder of previously visited locations in a file.
- To set or unset a bookmark: Position the editing cursor on the line of interest. Select Navigation > Toggle Bookmark or use the associated key binding to bookmark the line. If the line is already bookmarked, the bookmark will be removed.
- To move to the next bookmark: Select Navigation > Next Bookmark or use the associated key binding.
- To move to the previous bookmark: Select Navigation > Previous Bookmark or use the associated key binding.
- To clear all bookmarks: Select Navigation > Remove All Bookmarks or use the associated key binding.
Quick bookmarks are almost identical to regular bookmarks but have been implemented to allow the user to access/jump to a bookmark directly using an index (0-9). Quick bookmarks are set per document.
- To set or unset a quick bookmark: Right-click and select Quick Bookmark > Toggle Bookmark [0-9] or use the associated key binding to bookmark the line. If the line is already bookmarked, the bookmark will be removed.
- To go to quick bookmark [0-9]: *Right-click and select Quick Bookmark > Go to bookmark [0-9] or use the associated key binding to bookmark the line. The Go To… menu will not appear unless the bookmark index is set in the current doc.
- To clear all bookmarks: Select Navigation > Remove All Bookmarks or use the associated key binding.
Komodo has three commands for Emacs-style transient marks, which have following defaults using the Emacs key binding scheme:
- Editor: Set Mark - Ctrl+Space
- Editor: Exchange Current Point and Mark - Ctrl+X, Ctrl+X
- Editor: Move to previous mark in mark ring - Ctrl+U, Ctrl+Space
These commands can be bound to custom key sequences in the Key Bindings preferences with any key binding scheme.
Matching Braces
Use the Matching Brace functions to quickly jump between opening and closing braces and parentheses. Notice that when the editing cursor is adjacent to a brace or parenthesis, the brace is displayed in bold red. The associated closing or opening brace is also displayed in bold red.
To jump to the matching brace, select Navigation > Jump to Matching Brace, or use the associated key binding. To select the braces and the contents they contain, select Edit > Select > Select to Matching Brace.
Detecting Changed Files
Komodo can be configured to monitor the status of files that are opened in the editor. If the file is changed on disk, you will be prompted to reload the latest version under the following circumstances:
- when you change between tabs in the editor
- when you switch back to Komodo from another application
- when you save a file
Use Komodo’s Preferences to enable or disable this function.
Track Changes
Track Changes allows you to revert regardless of their location relative to your undo history. Using the Track Changes margin, found to the right of line numbers, you can see deleted lines (default red), edited lines (default blue), and added lines (default green). The default colors can be customized in your preferences under Color Schemes: Colors.
The tracker margin includes Source Code Control (SCC, IDE only) changes when the file is under revision control. If the document is in SCC, the tracker margin shows changes against the last commit.
If the file is not under SCC control it shows the unsaved changes compared to what is on disk.
Track Changes feature is also in Komodo Edit, although it does not have the SCC components, so the margin will show unsaved changes to what’s on disk.
When a “change” is clicked in the Track Changes margin, you are given the option to Revert Changes or Share on Kopy.io. Reverting does exactly what it implies. It reverts that single section. Sharing on Kopy.io will simply push that single section to kopy.io so you can share it with a colleague.
Use Komodo’s Preferences to enable or disable this function.
Share
Komodo allows users to share content in two ways. Share to Kopy.io and share to Slack. You do this through the Share Menu which can be found in a number of locations in the Komodo UI: - Editor Context menu - Diff context menu (found in Version Control widget and anywhere else a Diff is displayed) - Track Changes - Logs window (Help > Troubleshooting > View Log File)
There is an API to allow you to more easily include custom share tools in the share menu. See the ko/share docs.
Kopy.io Integration
kopy.io is a pastebin-like service created by the Komodo developers, it allows you to easily share snippets of code right from Komodo to your web browser.
See Share for locations of the share menu.
Slack Integration
You can easily post code snippets from the Share menu to Slack. Slack share allows you to posts snippets to either a channel, person or group. For more information see Slack.
See Share for locations of the share menu.
Preview in Browser
You can configure Komodo to preview a variety of file types in your default browser, or in the Editor Pane. The Preview in Browser feature is particularly useful when working with HTML or XML files.
The browser preview will be displayed in a separate window, in the Editor Pane, or in a split view of the Editor Pane, depending on which preference has been set.
The context menu in the Editor Pane is only available when the “source” tab is in focus. If Komodo does not support previewing of a specific file type, the Preview in Browser option will not be available from either the toolbar or the View menu.
To preview a file with the Preview in Browser feature:
- Open the file in the Komodo Editor Pane. Or, if the file is already open, make sure it is the selected tab in the Editor Pane.
- Select View > Preview in Browser. A dialog box will appear, prompting you to choose which file to preview.
- If you want to preview the current file, select Preview with this file, or, if you want to preview using another file that includes the current file (e.g., use an HTML file to preview a CSS file), select Preview with another file or URL, then click Browse to navigate to the desired file location. If you do not want to be prompted each time you preview a specific file, select Remember this selection for this file. If you later decide that you want to specify a different preview selection, change the Browser Preview file or URL in the current file’s Properties and Settings.
- Click Preview. The file will be displayed in the Editor Pane or in a separate window, depending on which preference has been set.
Previewing HTML and Markdown files
You can view live HTML output for HTML and Markdown files within Komodo using the Preview pane. The view updates automatically as you make changes to the files in the Editor pane.
- Open an HTML(.html) or Markdown(.md) file in the Editor pane. If the file uses a different extension you will need to set the language.
- Click Preview
 in the top-left toolbar.
 - Update the contents of the file in the editor, as necessary, and verify the formatting of the file in the Preview pane.
The Minimap
The Minimap gives a 30,000-foot overview of your document. It uses the same coloring as in the main document, but with a much smaller font. You can either use the scrollbar as usual, or click at a point in the Minimap to go to that point in the editor.
You can change the minimap font size via the minimap context menu on Windows and macOS (to be added to Linux at a later date), or use the usual Ctrl+Shift+MouseWheel combination (Cmd+Shift+MouseWheel on macOS). If you zoom out too far, nothing appears to change, but you’ll need to zoom back in the same number of positions to get to the point where the font size again appears to change.
You can show the minimap for the current file by selecting View > View Minimap.
To change this setting globally: 1. Select Edit > Preferences (Komodo > Preferences on macOS). 2. Click the Editor entry in the left-hand list. 3. In the Scrolling section, select the Use the Minimap Scrollbar checkbox.
Editor Tab Display
Use the following commands on the Window menu to manage the way previews and tab groups are displayed in the Editor Pane:
- Move to Other Tab Group: Splits the Editor Pane (if not already split) and moves the active file to the other tab group.
- Split View: Splits the Editor Pane (if not already split) and displays the active file in both tab groups.
- Rotate Tab Groups: If two tab groups are displayed, this option switches between a horizontal and vertical split.
If displayed in the Editor Pane, previews include a toolbar with basic Web browser functionality, including (from left to right) “Back”, “Forward” “Reload”, and “Stop” buttons.
Related Information
Feature Showcases