Source Code Control
(Komodo IDE only)
Source code control (also called “revision control”, “version control” or “code management”) is the practice of managing changes to a set of files in a common repository. Files can be checked out from the repository, edited, reverted, merged, checked in or compared with other versions.
Komodo supports common operations for the following SCC systems:
From within Komodo, you can perform the following SCC actions:
- Add files to the repository
- Remove files from the repository
- Compare files in the editor against their repository versions (a “diff”)
- Show a revision history for a file
- Submit files back to the repository
- Revert files to their previous state
Depots, repositories, branches, and projects cannot be created or configured from within Komodo. This must be done using the SCC software directly. Komodo’s SCC features become available when files are checked out from the source code repository.
Komodo can work in conjunction with external graphical SCC clients such as TortoiseCVS and TortoiseSVN. However, the command line executables (i.e. cvs and svn) must be present on the local system.
SCC functions are available in the following locations:
- File Menu: Select File > Source Code Control > [option].
- Places Pane: Right-click a file or folder in the Places Pane and select from the Source Code Control context menu options.
- Editor Pane: Filename tab: Right-click a tab in the Editor Pane and select from the Source Code Control context menu options.
- Open Files Pane: Right-click a file in the Open Files Pane and select from the Source Code Control context menu options.
The Source Control submenu options are the generally the same regardless of which method is used to access the menu.
Using Source Code Control
Source Code Control Dynamic Toolbar
Access common source code control commands from the dynamic toolbar, at the left of your screen when using IDE, or on the left side of the “Go To Anything” field on Edit.
The SCC dynamic toolbar button is only visible when your current project is under version control. If the button is not showing while you believe it should be you can try closing and then reopening your project to force a refresh.
Refer to the command descriptions below for more information.
Version Control Widget
The bottom pane contains a “Version Control” widget which provides quick and easy access to your commit dialog and project and file history, as well as the ability to view results from source code control commands in the Log tab.
This widget only shows information if your current project is under version control. Refresh buttons show in various places to force a refresh when necessary, but generally Komodo should pick up on changes automatically.
Source Code Control Output Tab and Status Messages
The Notifications tab is located in the Bottom Pane of the Komodo workspace. As you execute source code control commands, such as editing or checking in files, details of the commands are displayed on this tab along with any error messages or warnings generated.
The “Log” tab on the “Version Control” widget also contains output exclusively for source code control commands.
Source Code Control Commands
As described above, source code control commands are invoked from the toolbar, the File menu and the Source Control context menu. The following commands are available, depending on the context:
- Clone/Checkout: Launches the SCC Checkout wizard for fetching a local copy from a repository.
- Add: Add a file from a designated source code directory on your local drive to the source code repository.
- Edit: Unlock a file for editing.
- Revert Changes: Check the file back into the repository, abandoning any changes made since it was checked out.
- Remove: Delete the file from both the source code repository and the corresponding local directory.
- Update: When the local version no longer matches the repository version of a file, select this command to update the local version of the file.
- Show Changes: Show what has changed in your project since the last commit. Depending on the setting in Preferences, the diff display is shown on another Komodo editor tab or in a separate window. If the display style for diffs (Edit > Preferences > Source Code Control) is set to Create new window, press ‘F9’ or select Jump to Corresponding Line to open and/or shift focus to the original file in the Editor Pane. If viewing a diff in an editor tab, right-click and select Jump to Corresponding Line to shift focus to the editor tab containing the source code. Selecting this option opens the source code tab in the Editor Pane if it is not already open.
- Revert Changes: Revert changes on the current project.
- History: Show the change history for the current project.
- Commit: Submit the file back to the source code repository.
- Push: Applicable to distributed source control systems only; propagates local commits to remote repositories.
- Pull: Applicable to distributed source control systems only; pull in commits from remote repositories.
Pull with Rebase: Applicable to distributed source control systems only; pull in commits from remote repositories using rebase.
File Colors
Komodo indicates the source code control status of files by coloring the file names. Although the colors may vary by color scheme, they generally follow the following pattern:
| green | The file is being added to the source code repository. |
| red | The file is being deleted from the source code repository. |
| blue | The file has been locally modified. |
| normal | The version of the file in your local directory is in sync with the version in the source code repository (i.e. there are no pending updates from the SCC server). | teal | The version of the file in your local directory is out of sync with the version in the source code repository. |
| orange | There is a conflict between the version of the file in your local directory and the source file that cannot be resolved by simply syncing your directory with the source code repository. The discrepancy must be manually resolved. |
Refresh Status
To refresh the SCC status of the current file do one of the following:
- Right-click the on file tab or within the editor pane and select Refresh Status
- Right-click on the file in the Projects sidebar and select Refresh Status
- Click Refresh Status on the File menu
- Press ‘Ctrl’ + ‘K’, ‘R’
To refresh the SCC status of an entire folder, do one of the following:
- Right-click the on the folder and select Refresh Status
- Select the folder in the Projects sidebar and click Refresh Status on the File menu
- Select the folder in the Projects sidebar and press ‘Ctrl’ + ‘K’, ‘R’
SCC Checkout Wizard
Komodo’s Checkout command launches a wizard which steps through downloading a local copy of a set of version controlled files (e.g. a branch).
Step One: Set the SCC handler and the checkout data
Set the following options:
- SCC Handler: Choose the SCC system to use (e.g. svn, git, bzr, etc.)
- Checkout URL: Specify the specific URL of the branch being checked out (e.g. https://github.com/Komodo/KomodoEdit.git). Specify the protocol to use (e.g. “http://“, “rsync://“, “git://” etc.).
Save to: Specify the local directory to download to. Some SCC clients, such as CVS, will require that the specified directory already exists. Others, such as SVN, will create the directory if it does not exist already.
Step Two: Customize the checkout parameters
Each SCC handler will have different additional parameters which can be set:
- git:
- Local repository: Used if the repository to clone is locally available. Uses the “–local” command line option.
- Do not perform a HEAD checkout after cloning: Uses the “–no-checkout” option.
- Make a bare GIT repository: Uses the “–bare” option.
- hg:
- Revision: The revision number to check out. Current if unspecified.
- Do not update the new working directory: Uses the “–noupdate” option.
- Use pull protocol to copy metadata: Uses the “–pull” option.
- Use uncompressed transfer (fast over LAN): Uses the “–uncompressed” option.
- svn:
- Revision: The revision number to check out (HEAD by default).
- Only check out the top folder: Users the “–non-recursive” option.
- Omit externals: Uses the “–ignore-externals” option.
- bzr:
- Revision: The revision to check out. User the revision number or other revision identifier.
- Hard-link working tree files where possible: Uses the “–hardlink” command line option.
- cvs:
- Module: A path within the repository or a CVS module name (required field).
- Branch or Tag: The branch or “sticky tag” of the branch to be checked out.
- Specific date: Checkout version from a specific date. Accepts a variety of date formats (e.g. “YYYY-MM-DD HH:MM”).
- Checkout Type: Normal (for working on the modules) or Export (for making a software release).
The options mentioned above are explained with more detail in the documentation for each SCC handler:
- Bazaar User Guide
- CVS Documentation
- Git Documentation
- Distributed revision control with Mercurial
- Version Control with Subversion:
Step Three: Command line summary
The last step in the wizard shows the command to be executed based on the options chosen in the previous two steps. Click Checkout to run the command. Current status and command output will be displayed as the command runs.
Note: The SCC Checkout wizard does not correctly handle password authentication. SCC checkouts requiring password authentication should be done at the command line. You can do this by copying the command shown in the command line summary and pasting it into a terminal.
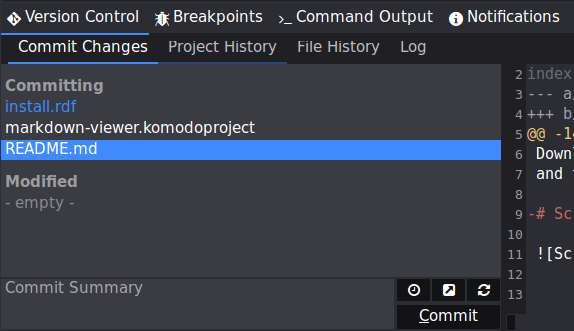
Commit (Check-in to Source Control) Dialog
Clicking the Source Code Control: Commit button or selecting Commit from the SCC context menu brings up the commit dialog. You can also access this from the Version Control widget.
The left pane shows a list of files for inclusion in the commit. Komodo scans the current directory and all subdirectories under SCC control to populate this list and show the SCC status of each with an icon.
Double click or right click file you would like to include in the check-in, you can hold shift or ctrl so select multiple files. Files that will be committed will be grouped as “Committing”.
Push Dialog
Clicking the Source Code Control: Push button or selecting Push from the SCC context menu brings up the following dialog box. Note that this dialog is only available for supported distributed version control systems.
The Remote Repo text box at the top determines where the push will go to; Komodo will attempt to determine the most appropriate remote URL, and can also offer suggestions about known remote repositories via the drop-down.
The Branches section (only available for git and mercurial) determines which branches to push. Selecting multiple branches will result in pushing the selected branches to the remote repository. Selecting no branches will push the default branch.
The Tags section (only available for git) determines which tags to push. By default no tags are pushed; selecting one or more tags will add them to the set of things to transmit.
The Options section has additional parameters which can be set, depending on the source control system in use:
- bzr:
- –overwrite: If the local branch has diverged from the remote branch, this forces the remote branch to be updated without merging. Selecting this can cause you to lose commits; use with care.
- git:
- –force: Forces pushing branches and tags which already exist remotely but have diverged. Selecting this can cause you to lose commits; use with care.
- –no-thin: Disables the use of thin packs. Selecting this option usually results in higher bandwidth usage, but may reduce CPU consumption slightly.
- hg:
- –force: This causes mercurial to allow creation of new heads on the remote repository. It is recommended to pull from the remote and merge first instead.
A preview of the command line which will be executed can be seen in the Command Line section.
Configuring Perforce (P4)
Basic Perforce Configuration
- If you have not already done so, install Perforce on your system.
- Check out files: Komodo does not have integrated SCC checkout functions. As necessary, run
p4from the command line (e.g. ‘p4 sync _path_’). - Enable Perforce support in Komodo: Under Preferences|Source Code Control|Perforce and ensure that the “Perforce Integration” option is checked and that the
p4executable is available in yourPATHor is specified with a full pathname. - Set P4 environment variables: Unless Komodo is always started from a shell with all necessary P4 environment variables set (e.g. P4CLIENT, P4PORT, P4USER), you will need to specify them in Komodo’s Environment preferences.
- Open any file under Perforce control in Komodo.
Komodo should now recognize that the file is under Perforce source code control and the SCC menus and status icons should be enabled. If not, click Refresh Status on the File menu (or Ctrl-K, R) to force it to reset.
Users of Perforce’s P4CONFIG feature may find that Komodo’s source code control doesn’t work unless Komodo is started from within the client view of the Perforce repository.
Configuring Preferences
Use the Source Code Control page in Komodo’s Preferences to configure Source Code Control integration. To open the Komodo Preferences dialog box, select Edit > Preferences.